


A tooth implant diagram helps you see what’s happening below the gum line and how each part works together. This post walks through a clear tooth implant diagram, names each part, and explains why each part matters for your treatment and long-term success.
What Is a Tooth Implant?
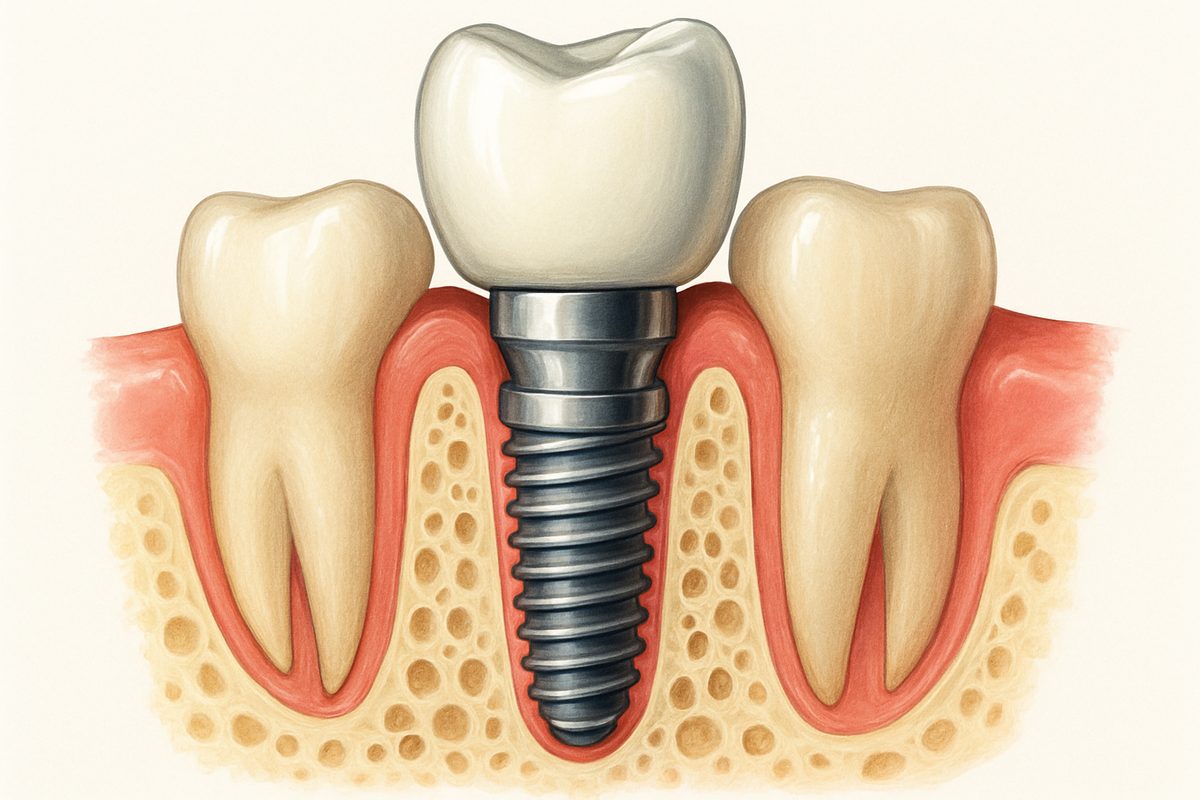
A tooth implant is a replacement tooth root that holds a visible tooth (crown) or other prosthesis. The implant itself is usually a metal or ceramic post placed into the jawbone. The crown is the visible part you chew with. A tooth implant diagram separates the hidden root (implant) from the crown so patients can understand both roles.
Key Parts Shown on a Tooth Implant Diagram
Implant Fixture (the “root”)
The fixture is the screw-like post placed into the bone. Most diagrams show titanium or zirconia fixtures with threaded shapes. The fixture’s job is osseointegration — fusing to bone so the implant is stable and can bear chewing forces.
Abutment (the connector)
The abutment links the implant fixture to the crown. Diagrams may show straight, angled, or custom abutments. Some abutments screw into the implant; others are cemented. The abutment determines the crown’s angle and fit.
Prosthetic Crown
The crown is the visible tooth shaped to match your bite and smile. Diagrams label crown materials such as porcelain, zirconia, or metal-ceramic, and show how the crown fits over the abutment or attaches with a screw.
Surrounding Bone and Gum Tissue
Good diagrams show jawbone levels and gum tissue around the implant. Bone height, density, and healthy gum tissue are vital for long-term success. These layers explain why bone grafts or gum treatment might be needed first.
Other Components: Healing Caps & Screws
Temporary parts, such as healing caps or cover screws, often appear on diagrams. Healing caps protect the implant during recovery and shape the gum, while retention screws hold crowns or bridges when they are screw-retained.
Common Implant Types Illustrated
Diagrams usually show single-tooth implants, implant-supported bridges, and full-arch solutions like All-on-4. Single-tooth diagrams show one fixture and crown. Bridges use two or more implants to support multiple teeth. Full-arch diagrams show fewer implants placed strategically to support a whole row of teeth.
How to Read a Tooth Implant Diagram: Patient Tips
Look for implant position relative to nearby teeth, bone depth, and angulation. Note which pieces are permanent (fixture, abutment, crown) and which are temporary (healing caps). Ask your dentist: Where will the implant sit? Will I need bone grafting? Is the crown screw-retained or cemented?
Treatments Related to Diagrammed Parts
If bone is low on the diagram, bone grafts may be needed. Upper back teeth often show sinus lift procedures. Diagrams can show immediate placement (implant at extraction) or delayed placement. Same-day crowns (CEREC) may be shown when a final restoration can be milled and placed quickly.
Benefits of Understanding the Diagram
Knowing the parts helps set realistic expectations about timelines, costs, and risks. It makes it easier to compare options, ask informed questions, and follow post-op care instructions that protect both the implant and surrounding tissue.
About Wellington Family Dentistry & Implant Center and Dr. Pringle
Wellington Family Dentistry & Implant Center in Wellington, CO, offers technology-forward implant care led by Dr. David J. Pringle, D.M.D. The practice uses digital planning, CEREC same-day restorations, CAD/CAM, 3D printing, and photogrammetry to design and restore implants precisely and comfortably.
Next Steps / Call to Action
Bring any tooth implant diagram you have to your consult and use this post’s questions to guide the conversation. To schedule a consult or learn how digital tools can improve your outcome, contact Wellington Family Dentistry & Implant Center and speak with Dr. Pringle’s team.